How to Make a Stop Motion GIF in Photoshop

Howdy! Let's talk about stop motions and go over the basic steps for how to create a stop motion GIF using Photoshop.
Stop motion animation is a technique where you take a series of still images as you manually animate an object to make it appear like it’s moving on its own. Stop motions have been around for a very long time, but recently they have gained a lot of traction and popularity on social media and other marketing platforms. A lot of the stop motions you see on social media are in the forms of GIFs. These are concise stop motions which are created using a small amount of frames to produce moving images. GIFs are great for showcasing a product or service in unique ways. On the opposite side of the stop motion spectrum, there are also other amazing forms of animation, like full feature films. Films like Kubo and the Two Strings, Missing Link, and Isle of Dogsare impressive works of art which were entirely created using the same techniques.
You don’t need to be a big agency to create amazing GIFs. Stop motions are a valuable service to offer clients because they are a great way to offer motion if you don't offer other video services. I personally love to make stop motion GIFs because I enjoy the creative process of brainstorming how to animate an object and make it come to life.
Ready to take a whack at it yourself?
Without further ado, let’s go over the basic steps for how to make a stop motion GIF.
Plan your animation
Get creative! What are you animating? Is it a product? Clay? Is it a paper airplane? Maybe some food? Cosmetics? An article of clothing? Whatever your subject is, start planning out how you want to make it come to life. The possibilities are endless!
Prepare your camera and lighting equipment
Get your equipment ready! Make sure your camera is in a secure position, preferably on a tripod. Set up your lights and everything else you’ll need for production. As you’re setting up, remember to give yourself enough room to animate without accidentally bumping into anything.
Once you toggle around with your settings and light to the point where you are happy with everything, don’t touch it again! The less you touch your camera and/or have changes in your lighting, the cleaner your stop motion will be.
Execute your animation
Next, it's time to animate! Style your subject for the first shot. Go through your planned animation by moving your subject(s) bit by bit as you take frame after frame, making sure to move slowly and to not bump anything out of its appropriate position. Don’t touch the camera or the lights as you work. The smaller the animation movement in between frames, the more seamless your stop motion will appear.
If you accidentally move something by mistake, it's probably best to just start over from the beginning. If you have the time to play, I suggest shooting your stop motion animation multiple times. Sometimes initial ideas can change or grow into something even better after simply taking the time to use your imagination as you rehearse your movements.
BTW (by the way) : Work smarter, not harder... If you are trying to animate your subject into a very specific design, try animating backwards. When you’re animating a stop motion, it’s easier to take a design apart rather than trying to build it together without making any mistakes.
Import your images to Adobe Lightroom Classic
After you’re done with shooting, import your images into Adobe Lightroom Classic.
When I'm shooting a stop motion gif, I like to plan ahead as much as possible. I try to avoid any unnecessary editing in post by addressing easy issues during production. This includes cleaning dust or product debris away in between shots and checking for fingerprints and other smudges along the way.
If you still need to make edits to your series of images, Lightroom makes it easy to do batch edits. With a simple copy and paste, you can basically apply the same edits (brightness, saturation, contrast, etc.) to all of your images which helps everything remain consistent.

Just right click and Paste Settings to quickly execute batch edits.
Hop on over to Adobe Photoshop
Next, it’s time to move the images into Photoshop. An easy shortcut I like to take is to highlight all of the images you plan to use in your stop motion (still in Lightroom), just right click and choose the Edit In > Open as Layers in Photoshop option. It may take a second for everything to move over to Photoshop (depending on how many images you are using), but it's an easy way to get all of the images opened together as layers in the same file.

Select all the images you need before you right click to open in Photoshop.

Welcome to Photoshop! All of your images should appear as layers.
Use Timeline to make frames from layers
Now that all of your images are in Photoshop in the form of layers, it’s time to make the animations come to life! Just click Window at the top of Photoshop and scroll down until you see Timeline (it’s near the bottom). Click on Timeline and a little new window should open up underneath your image. Next click on Create Frame Animation. Then find the tiny button in the corner of Timeline and click on it. Choose Make Frames from Layers.

Go to Window > Timeline and click to open the Timeline box.
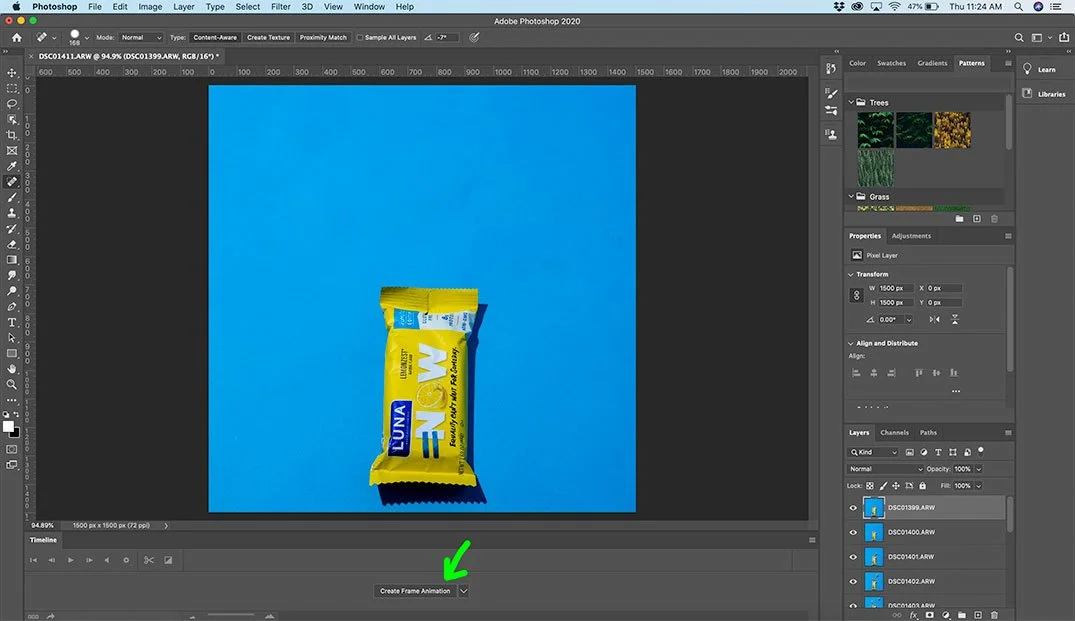
Click on Create Frame Animation.
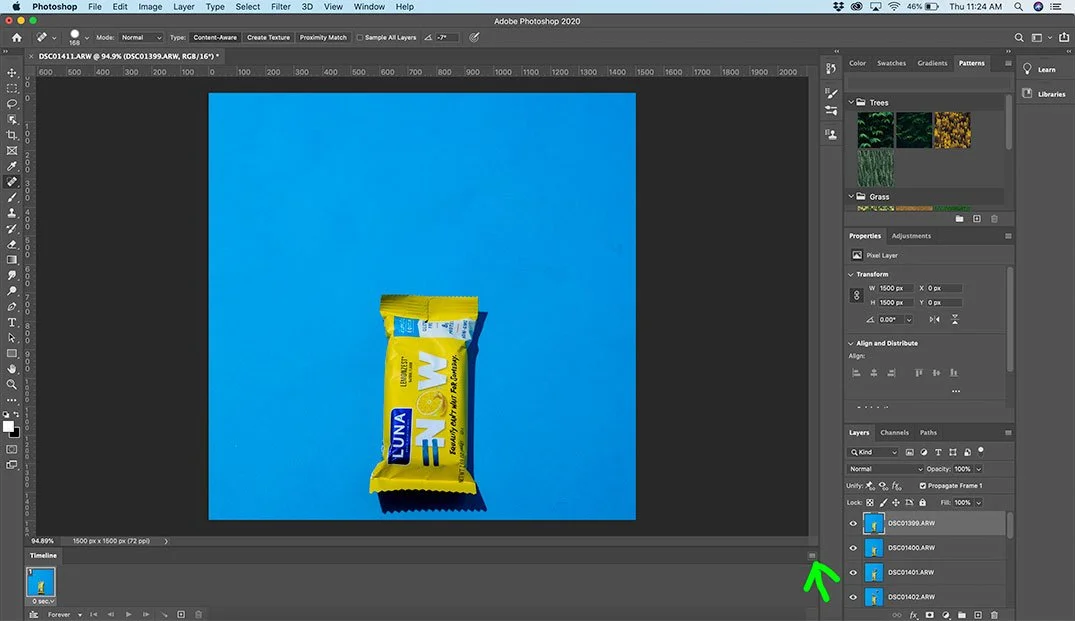
Find this tiny button and click.

Choose Make Frames from Layers.
Adjust frame time and sequence
Great! Now that your images are in the Timeline, you can press play to catch your first glance at what your images look like in motion together! Depending on the animation, you may need to change the speed of your frames. A safe go-to that I usually use is 0.2 seconds, but you can change it to whatever looks and feels good for your animation.

Adjust to your desired speed.
If your frames are mis-ordered because you started your animation process from the end and worked backwards, there is a super quick fix! Just highlight all of your frames within the Timeline box and look for the four horizontal lines and click on that little button! Next, click Reverse Frames and bam! Just like that, your frames have been reversed and everything should make a little bit more sense with your animation.
Export so you can share your beautiful creations
Finally, it's time to export! Once you are satisfied with the speed and order of your frames, it’s time to share your awesome creation! Depending on where you’d like to share your GIF, you can either export it as a .gif file or render it as an .mp4.
If you’re going to share it with a friend or on your website, I suggest using the File > Export > Save For Web (Legacy) > .gif route.

File, Export, Save for Web as .gif file.

Double check you've selected .gif file and your image size. Click save.
If you’d like to share your art on a social media platform like Instagram, you’ll have to render it into an .mp4 format. Just go to File > Export > Render Video to save as an .mp4 file.

File, Export, Render Video as .mp4 file.

Check your settings and image size. Click Render to save as a video.
And that's it! Tah Dah!
Check out the finished product below, along with a couple other stop motion GIFs I made using the same steps.